Steps to take so that your Google AdSense Hosted is upgraded to Non-hosted
Back in the days, submitting a request for an AdSense account through YouTube or any blogspot which was easily approved became a place for low quality and spamming blogs. Hence, Google decided to change its policies offering two types of Google AdSense accounts: hosted and non-hosted.
Let’s see first how you can set them apart and second the aspects you should take into consideration before submitting your request for a non-hosted account.
Google AdSense Hosted Account
Hosted AdSense account is the account that you sign up for utilizing Blosgspot, YouTube, HubPages, which are partner sites of Google. Google allows you to own one AdSense account that you can use to generate money from non-hosted websites and other websites as well. However, applying and using your AdSense account should comply with Google’s policies and terms. When you apply for the hosted AdSense account, the blog or website you own have to accomplish the quality required by Google. Your request will be reviewed manually by Google’s team of experts.
Google AdSense Non-Hosted Account
Whereas getting an AdSense hosted account is easy, owning an AdSense non-hosted account is not as easy as it used to be due to the previously mentioned reasons. The non-hosted account is the type which can be used on any website owned by you on domains like .org, .net or .com.
Before placing your ads on other websites, your account has to be approved or else, the ad place will be white.
Some aspects you should check first before submitting your request for a non-hosted account
- It is highly important to provide quality content on your blog. Quality content means useful and informative, free from spelling and grammar mistakes, and long enough articles.
- Add a good number of posts. A high number of posts do not equal quality content so better upload a minimum of 20 good quality posts rather than 300.
- Mind the type of your content. There are some content types which are not accepted by AdSense: pirated content, adult materials, illegal drugs, hacking and cracking tutorials and other illegal activities.
- Create a privacy page for your blog. Even though there are people who dismiss the importance of having a privacy page for a blog, Google does not. This requirement is important as it is a proof that you are not a scam.
- Do not forget to complete the About us and Contact us sections on your blog. The About us page not only allows you to create a trustworthy relationship with your readers but without filling the About us section, your AdSense account will not be approved. Also, setting up the Contact us page bears the same importance as the About us page. Creating a contact page shows Google that you care for your customers.
- Do not forget to verify your email and name in a visible area. This will speed up the verification process nd you will be able to enjoy faster a fully approved AdSense account.
- You have to be above 18 which give you the possibility to use the same payee name as on your bank account.
- Your website besides its good design it should load rapidly. A clean, professional and fast-loading design is highly appreciated by Google.
- You have to use domains such as .net and. org for your blog. It is highly important to own a unique domain which is specific for your blog. If you do not have one, then it is important to use a top level domain otherwise, Google will not approve your account.
While longevity is not as important for Google as the relevance of the blog content for the audience, Google will still check it. Whereas some users have mentioned that Google approved their account even though the blog was active for less than 5 weeks, some others have complained that even if their blog was active for more than 6 months, Google did not approve it.
- The content on your blog/ website has to be optimized using the appropriate keywords for the search engines.
- It is best if you remove other advertising networks. Make sure that your bog is free from ads.
- Do not submit your request for an AdSense account if your blog is getting paid traffic. Organic traffic is the best solution accepted by Google.
Upgrading your hosted account into a non-hosted in 6 steps
As we have previously mentioned, a quality website is a first step in the process of non-hosted AdSense approval. Second, you are required to submit your request for the upgrade which will be reviewed by Google’s team of experts. Here is what you have to do step by step:
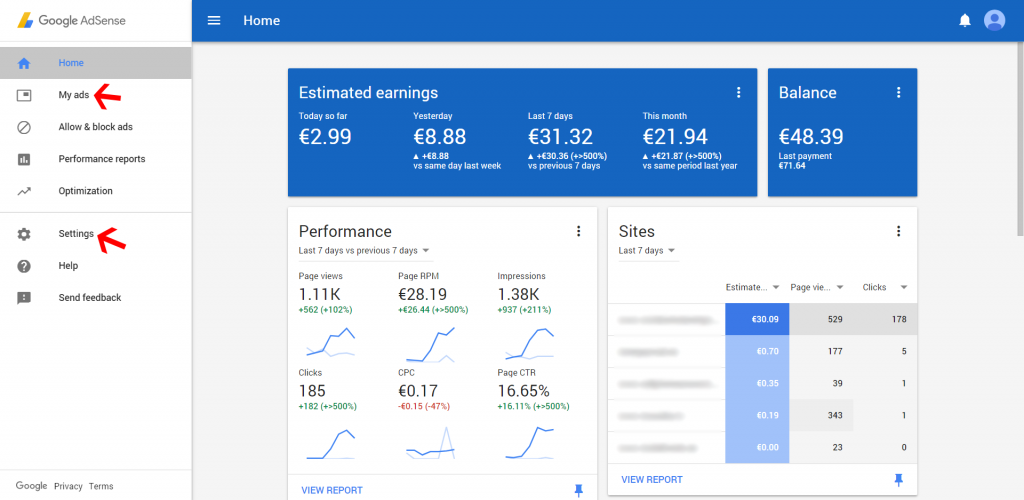
- Log in your own AdSense account.
- Look for the gear icon, click on it and select the settings option.
- On your left side click on the “Access & Authorization” section which will display a number of options. However, you have to click the first one named “Site authorization”.
- After clicking “Site authorization”, the “Show ads on other websites” page will be displayed. Enter the URL of the website where you intend to display your ads.
- Click the “Submit” option. After you submit your request, it is important to add the AdSense code in the blog you have previously submitted above.
- Add the AdSense code to your blog/ website. How do you do that?
- Log in your AdSense account and click My Ads tab.
- Click “Content” option.
- Click “+ New ad unit”
- Then introduce the name of your advertising and customize it
- View details on the settings
- Choose the “Save” option and get the code
Once you have generated the AdSense code create a new HTML widget in your blog sidebar and add the AdSense code.
Your request will be automatically reviewed by Google which will take a couple of days and maybe more until you will get notified.

Linking WordPress to Google Adsense
WordPress may be the greatest novel writing platform of our time. WordPress is already an advocate for SEO content which allows many curators to post and establish a fairly large circle of traffic. Now by adding WordPress to Google Adsense, an even greater flow of action will come about.
By signing up with your Gmail account or another email account. The review process can take up to 8 hours maybe 10, however once this overview is complete Google will notify with an approval by logging in to Adsense.
Collect the code of the ad and head over to the ‘My Ad’ link next to ‘Home’. Click and proceed to click on the button that says ‘New ad unit’.
From here it is up to you to customize an ad. Based on style, size, format and color pick something that is associated with your WordPress site. Anything opposite of the topic or niche at hand will not draw in the needed traffic.
A hint towards what size should be picked…go with what the professionals use. There should be a drop down list of recommended ad sizes. If so, choose the one you prefer. However, if any problems persist attempt a backup ad. This only occurs if an ad cannot be acquired for you site which is an unlikely even to happen. Also the use of ‘Custom Channels’ will be at hand but if you are looking for a quick setup avoid this step.

Open WordPress widgets to apply the ad code. Since the sidebar, not the header is where the ad should be placed WordPress widgets needs to be downloaded and available. Open up to the main widget area under ‘Appearences’. Paste the ad code within the main box frame.
If WordPress widget is not cutting it, try downloading these other WordPress plugins. BuySellAds (PRO), Google DFP, AdSanity and Adrotate. These reliable plugin’s make ad management far easier than dealing with the manual custom by imprinting data. Take Adrotate which reveals the general statistics of average click on ads, click through rate and monthly overview click impressions. All compressed into a single graph showing the multi purpose use of Adrotate.
Since WordPress is another hosting site, adding to Google Adsense is quite a fantastic way to learn the details of running a website. Not only has content been provided by you or others. But the plugins managed by WordPress offer excellent tools towards educating bloggers about the internal world of data collection. Plus if you were already a WordPress user to begin with and insist on sticking with the website platform, this is a great alternative to starting over with a new site. Eventually you may come to a point in creating a new site however, with WordPress already fully operationally and with a faster approval waiting time there seems to be no worry.

What It Takes To Make $100 A Day With Google Adsense
As the voice of reason $100 may seem possible starting from a beginners standpoint. And yet, for the time it would be impossible. This $100 is aimed at individuals who have reasonably great traffic flow to their site. Around 40,000 to 50,000 pageviews will be needed to achieve this goal. Generally a rough estimate of anywhere to 600-800 pages should already be published. The published pages should be no less than 300-400 words (the word count can be more if you wish) and as an insider tip, a video should be attached to nearly every page at the end of your article. Whether It’s Youtube, Vimeo or another video platform website.
However, if content seems to elude you try speaking to your loyal followers. Ask for advice, tips and if anyone would like to contribute to the site. Whether the topics range from creative writing, technological advancements or relationship advice columns, having a helping hand can improve revenue as well as page views. Don’t forget to link up social media ties to the site. Spread the word through Facebook, Twitter, Tumblr, Instagram, Snapchat or even LinkedIn.
For some percentage details and numbers, to come anywhere close to $100 a day look at the CPC’s (Cost Per Click) and CTR’s (Click Through Rate). Since one site typically only allows three ad spots, times that by 100 for your CTR. So for a little math if you received 3 clicks from 300 ad impressions the CTR would be 1%. The formula looks like this 3/300 times 100. At the end of the day it all comes down to percentage. Yet this means the CPC would be priced at 25 cents per word.

Up to at least 100 viewers would actually have to view the site each day. But the fun part is the bonus section of page views. Depending on how many page views are calculated day to day this is where CPM (Cost Per 1000 Impressions) comes in. From 30,000 views could equal out to $30 – $50 dollars a day.
There is also another strategy about making up to $6,000 based on selling ads. Which honestly is a whole other category on it’s own. If you happen to be an expert on bidding, selling ad space and still managing a fairly decent amount of income from your blog then give it shot.
Again a bit of information to use, free content is available at the ready. Inviting in other writers or individuals who want to contribute may mean splitting a bit of that revenue. However if paying others to write content is not in the budget, make a suggestion page especially for open discussion. Some may be willing to write content for free publication. The suggestion/advice page is a great call on anyone’s part because from day to day (unless you are writing a novel and publish page by page) content tends to thin out a bit over time. Asking your visitors what they would like to read about is essential to staying connected and on top of the blogging world.